Kill Team Rules Reference

Core

Gameplay

Combat

Environment

Rules

Datacards

Datacards contain specific rules for each operative, including key stats.
Operative Stats

Action Point Limit (APL)

The total cost of actions an operative can perform during its activation, and a stat used to determine control of markers.
Some rare rules change an operative's APL
Regardless of how many APL stat changes an operative is affected by, the total can never be more than -1 or +1 from its normal APL
This takes precedence over all stat changes
Example: If an operative has an APL of 2, and two rules say to add 1 to the operative's APL, it would have an APL of 3.

Move

The operative's move distance, used when performing the Reposition, Fall Back and Charge actions.
An operative's Move stat can never be changed to less than 4"
This takes precedence over all stat changes
If an operative's stats are changed during an action, apply the change once the action has been completed

Save

The result required for successful defence dice whenever another operative is shooting the operative.
A higher numbered Hit and Save stat is worse because your chance of rolling a success decreases
This is important if a rule requires you to improve or worsen such a stat
For example, a 4+ Hit stat worsened by 1 is 5+

Wounds

The operative's starting number of wounds, which is reduced as damage is inflicted upon it.
Weapon Stats
Ranged weapon icon
Ranged
Ranged weapons for whenever an operative is shooting
Melee weapon icon
Melee
Melee weapons for whenever an operative is fighting or retaliating
AtkAttack
The number of attack dice to roll whenever an operative uses this weapon
HitHit
The result required for successful attack dice whenever an operative uses this weapon
DmgDamage
The damage each attack dice inflicts with this weapon. The first value is its Normal Dmg stat (damage from a normal success), the second value is its Critical Dmg stat (damage from a critical success)
Additional Rules
Sometimes different weapons will have the same primary name but different secondary names, represented in brackets, e.g. "plasma gun (standard)" and "plasma gun (supercharge)"
These are effectively separate profiles of the same weapon, but used as different weapons
If a rule refers to just the primary name, it includes all weapons with that primary name
Keywords
Used to identify the operative for rules – some rules will only affect operatives with the relevant keywords.
Shown in KEYWORD BOLD font
Keywords in orange with a skull symbol, e.g. TEMPESTUS AQUILON, are faction keywords – used to identify all operatives from that kill team
Bases
Bases size in mm.
25mm, 28mm, 32mm, 40mm, 50mm, 65mm

Bases

All operatives are on bases. The base is an important part of the miniature for rules purposes, in particular measuring distances. Each operative's base size is specified on its datacard. The sides of different bases can touch, but a base cannot be placed on another. Friendly operatives can move through other friendly operatives (the base and the miniature), but not through enemy operatives. Bases cannot move through terrain, or be over the edge of the killzone.
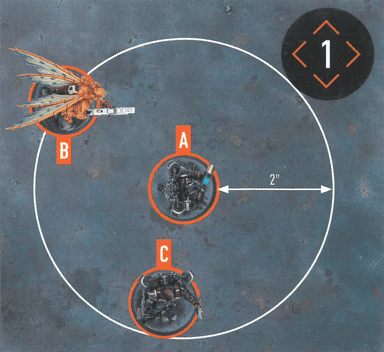
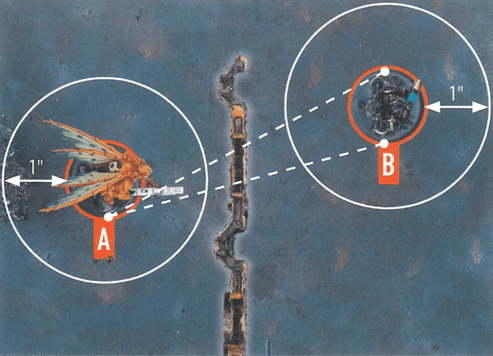
Control Range

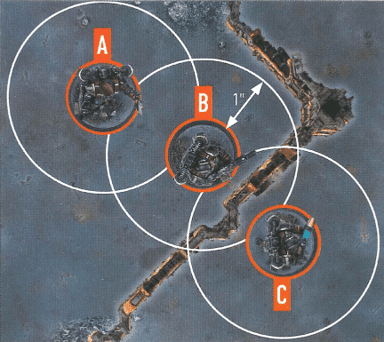
Many rules relate to control range such as moving, fighting and using cover. Something is within an operative's control range if it's visible to and within 1" of that operative.

Mutual Control

Control range between operatives is mutual, therefore operatives are within each other's control range if one of them is visible to and within 1" of the other.
Rule example
Operatives A and B are within each other's control range.
The terrain is within both operative B and C's control range.
Because of the terrain, operative B is not visible to operative C, and vice versa, therefore they are not within each other's control range.

Cover

Cover is determined from one operative to another, usually when one of them is shooting. An operative is in cover if there's intervening terrain within its control range. However, it cannot be in cover within 2" of the other operative.

Rule example
There's intervening terrain within operative A's control range, therefore it's in cover.
Rule example
There's intervening terrain, but it's not within operative A's control range, therefore it's not in cover.
Rule example
There's terrain within operative A's control range, but the terrain is not intervening, therefore it's not in cover.
Rule example
There's intervening terrain within operative A's control range, but operative B is within 2" of operative A, therefore it's not in cover.
Notes
An operative in cover with a Conceal order is not a valid targetAn operative in cover with an Engage order is a valid target, but has a cover save

Damage

When damage is inflicted on an operative, reduce their wounds by that amount. An operative's starting number of wounds is determined by its Wounds stat. If an operative's wounds are reduced to 0 or less, it's incapacitated, then removed from the killzone.

Wounded and Injured States

While an operative has fewer than its starting wounds remaining, it's wounded. While it has fewer than half its starting wounds remaining, it's also injured. Subtract 2" from the Move stat of injured operatives and worsen the Hit stat of their weapons by 1.
Notes
Keep track of each operative's remaining wounds with dice, tokens or by writing it down'Incapacitated' and 'removed from the killzone' are separate. Some rules take effect when an operative is incapacitated, but before it's removed

Dice (D6, D3)

Basic Roll Rules

Use 6-sided dice to determine the outcome of various rules. This will often require x+, where x is the lowest possible result, e.g., 3+. Sometimes a result within a range will be required, e.g., 1-3.

If a 4+ is required, a dice result of 4, 5 or 6 fulfils this

If a 1-4 is required, a dice result of 1, 2, 3 or 4 fulfils this

D3 Rules

To roll a D3, roll one D6 and halve the result (rounding up). Some require xD6 or xD3 (e.g., 2D6 or 3D3). Roll x number of dice and add the results together. Some require D6+x or D3+x (e.g., D6+2 or D3+3). Roll that dice and add x to the result.

Re-roll Rules

Some rules allow you to re-roll a dice roll. You can never re-roll a dice roll more than once, and you cannot select the original result, even if the new result is worse. If it's an attack or defence dice, you re-roll before it's retained or discarded.

If you can re-roll multiple different dice, you can do this in any order, including seeing the result of one re-roll before deciding on the next

Multiple Player Re-rolls

If multiple players can re-roll dice at the same time (e.g., during a Fight action), they alternate either re-rolling a dice or passing until they both pass in succession, starting with the player with initiative (this takes precedence over initiative and rules that would happen at the same time).

Distances

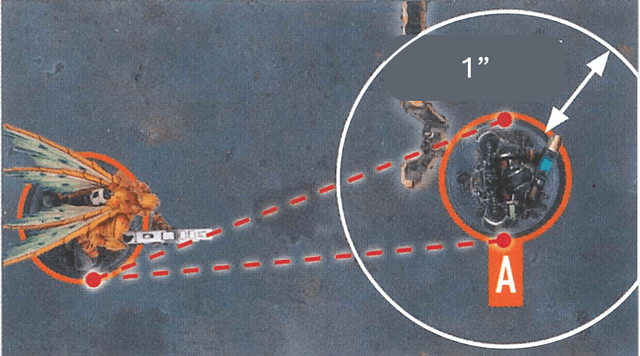
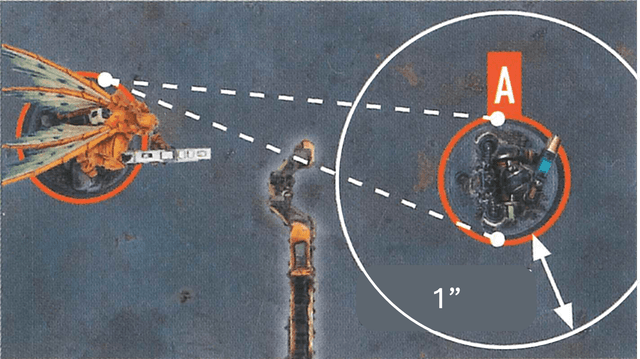
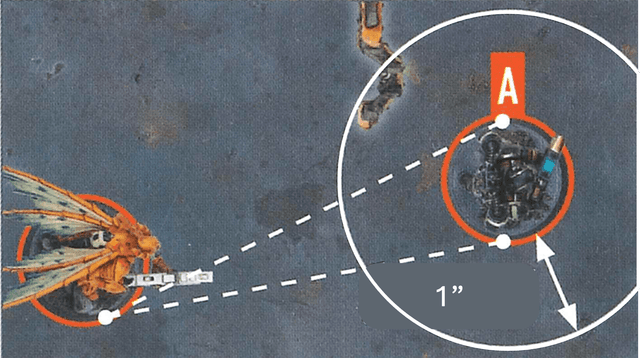
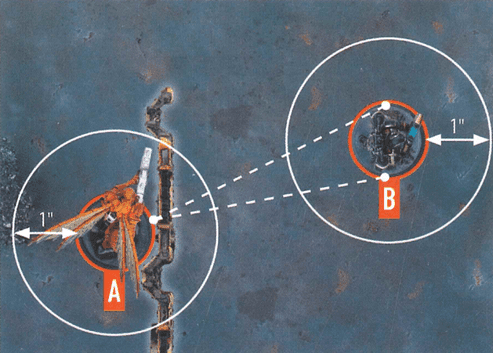
Various rules have a distance requirement in inches. When measuring to and from something, do so from the closest part of it. For an operative, do so from its base, ignoring all parts of its miniature. When measuring to and from an area of the killzone, measure the horizontal distance only (in other words, look from above to ignore the vertical distance).

Within and Wholly Within

If a rule requires something to be 'within' a distance, the requirement is fulfilled if any part of it is that distance or less. If a rule requires something to be 'wholly within' a distance, the requirement is fulfilled if every part of it is that distance or less.

Markers and Distance

An operative is always within and wholly within distance requirements of itself and a marker it's carrying. If an operative is carrying a marker, that marker is the same distance as that operative. Operatives within a certain distance of an operative that's carrying a marker are also within the same distance of that marker.
Rule example
Distance measuring example: Operative B is within 2" of operative A. The objective marker is within 2" of operative A. Operative C is wholly within 2" of operative A.

Equipment

Equipment are additional rules you can select before the battle, as specified in your game sequence.

Equipment Types

Universal equipment can be selected for any kill team whereas faction equipment is specific.

Equipment Limitations
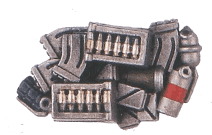
Each player cannot select each equipment option more than once per game.
Universal Equipment

1X AMMO CACHE

Whether stockpiles deliberately set out for warriors to access quickly, or the abandoned munitions of the slain, these caches can prove vital for a swift reload in the heat of battle.

Before the battle, you can set up one of your Ammo Cache markers wholly within your territory. Friendly operatives can perform the following mission action during the battle.
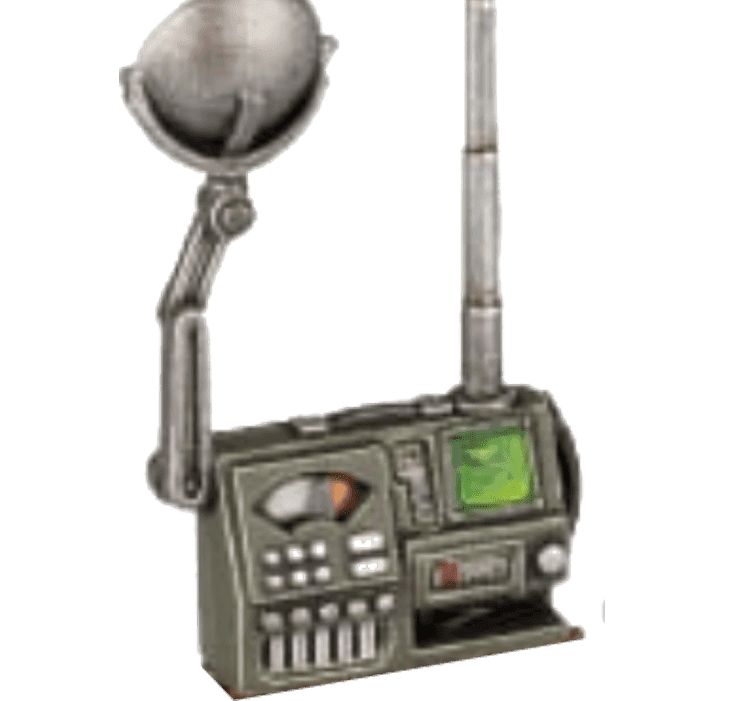
1X AMMO CACHE example 1
AMMO RESUPPLY0AP
One of your Ammo Cache markers the active operative controls is used this turning point.
Until the start of the next turning point, whenever this operative is shooting with a weapon from its datacard, you can re-roll one of your attack dice.
An operative cannot perform this action while within control range of an enemy operative, if that marker isn't yours, or if that marker has been used this turning point.

1X COMMS DEVICE

Communications devices can be swiftly hijacked and employed to coordinate operations or call in support during a firefight.

Before the battle, you can set up one of your Comms Device markers wholly within your territory. While a friendly operative controls this marker, add 3" to the distance requirements of its SUPPORT rules that refer to friendly operatives (e. g. , "select a friendly operative within 6"" would be "within 9"" instead"). Note you cannot benefit from your opponent's Comms Device markers.
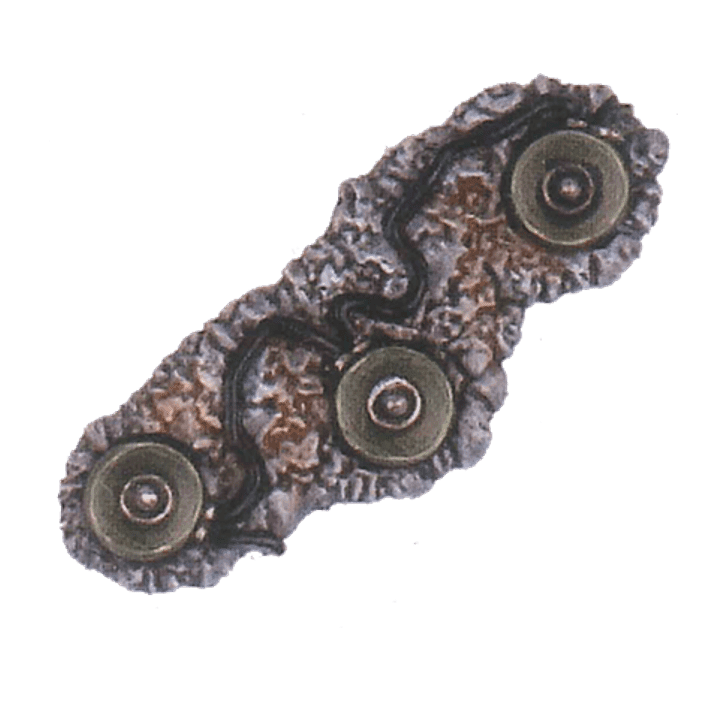
1X COMMS DEVICE example 1

1X MINES

The battlefields of the 41st Millennium are plagued by myriad types of mines, from simple frag charges to monofilament web-snares and microplasma charges.

Before the battle, you can set up up to one of your Mines markers wholly within your territory and more than 2" from other markers and access points. The first time that marker is within an operative's control range, remove that marker and inflict D3+3 damage on that operative.

1X MINES example 1

1X RAZOR WIRE

Spooled rapidly out and affixed to jutting posts, razor wire acts as an easily deployed barrier and a painful deterrent to enemy operatives seeking to attack along particular routes.

Razor wire is Exposed and Obstructing terrain. Before the battle, you can set it up wholly within your territory, on the killzone floor and more than 2" from all other equipment terrain features.

1X RAZOR WIRE example 1
Obstructing:Whenever an operative moves across this terrain feature within 1", treat the distance as an additional 2".

2X LIGHT BARRICADES

Designed to be lugged into place and then deployed by operatives and combat engineers, these barriers are proof against small arms fire.

Light barricades are Light terrain. Before the battle, you can set up any number of them wholly within your territory, on the killzone floor and more than 2" from all other equipment terrain features.

2X LIGHT BARRICADES example 1

1X HEAVY BARRICADE

A redoubtable slab of plasteel and adamantine, this layered protective barrier provides shelter amidst the fiercest firefights.

A barricade is terrain. Before the battle, you can set it up wholly within 2" of your deployment zone, on the killzone floor and more than 2" from all other equipment terrain features.

1X HEAVY BARRICADE example 1

2X LADDERS

Carried into battle in their compacted forms, these combat ladders deploy rapidly to provide a route of ingress to strongholds, or quick access to vital vantage points.

Ladders are Exposed terrain. Before the battle, you can set up any number of them as follows: Wholly within your territory. Vertically against terrain that has a height of at least 2". More than 2" from other equipment terrain features. More than 1" from doors and access points.

Climbing:An operative can either move through ladders as if they aren't there (but cannot finish on them), or climb them. Once per action, whenever an operative is climbing this terrain feature, treat the vertical distance as 1". Note that if an operative then continues climbing another terrain feature during that action (including another ladder), that distance is determined as normal.

1X PORTABLE BARRICADE

Little more than a suppression shield with armored feet, portable barricades can be hefted and borne forwards to provide mobile cover.

A portable barricade is Light, Protective and Portable terrain. Before the battle, you can set it up wholly within your territory, on the killzone floor and more than 2" from all other equipment terrain features.

1X PORTABLE BARRICADE example 1
Protective:While an operative is in Cover behind this terrain feature, improve its Save stat by 1 (to a maximum of 2+).
Portable:This terrain feature only provides cover while an operative is connected to it and if the shield is intervening (ignore its feet). Operatives connected to the inside of it can perform the following action during the battle.
MOVE WITH BARRICADE1AP
The same as the Reposition action, except the active operative can move no more than its Move stat minus 2" and cannot climb, drop, or jump.
Before this operative moves, remove the portable barricade it is connected to. After the operative moves, set up the portable barricade so that it is once again connected to it.
This action is treated as a Reposition action. An operative cannot perform the Move with Barricade action in the same turning point in which it performed the Fall Back or Charge actions.

UTILITY GRENADES

When you select this equipment, select two utility grenades (2 smoke, 2 stun, or 1 smoke and 1 stun). Each selection is a unique action your operatives can perform, but your kill team can only use that weapon a total number of times during the battle equal to your selection.

UTILITY GRENADES example 1
UTILITY GRENADES example 2
SMOKE GRENADE1AP
Place one of your smoke grenade markers within 6" of this operative. It must be visible to this operative or set on vantage terrain or a terrain feature visible to this operative. The marker creates a 1" horizontally and vertically unlimited smoke area from it (but not below it).
While an operative is wholly within a smoke area, it is considered obscured to operatives more than 2" away from it and vice versa. Additionally, when an operative shoots at an enemy operative that is wholly within a smoke area, the Piercing rule is ignored unless both operatives are within 2" of each other.
In the Ready Step of the next Strategy Phase, roll a D3. Remove that smoke grenade marker once a number of activations equal to the result of that D3 is completed, or at the end of the turning point (whichever occurs first).
An operative cannot perform this action while within the control range of an enemy operative, or if the total number of times your kill team can perform it has been reached.
STUN GRENADE1AP
Select an enemy operative within 6" of this operative and visible to it. That operative and each other operative within 1" of it makes a stun check. To make a stun check, roll a D6: if the result is 3+, subtract 1 from its APL stat until the end of its next activation.
An operative cannot perform this action while within control range of an enemy operative, or if you have reached the total number of times your kill team can perform it.

EXPLOSIVE GRENADES

The forces of the 41st Millennium utilise a wide range of offensive grenades, from simple fragmentation grenades to plasma and gravitic concussion grenades, and even more exotic devices employed to pierce enemy armour.

When you select this equipment, select two explosive grenades (2 frag, 2 krak, or 1 frag and 1 krak). Each selection is a unique weapon your operatives can use, but your kill team can only use that weapon a total number of times during the battle equal to your selection.

EXPLOSIVE GRENADES example 1
EXPLOSIVE GRENADES example 2
WeaponAHitDmg/CritSpecial Rules
Frag Grenade442/4Range 6", Blast 2", Saturate
Krak Grenade444/5Range 6", Piercing 1, Saturate

Intervening

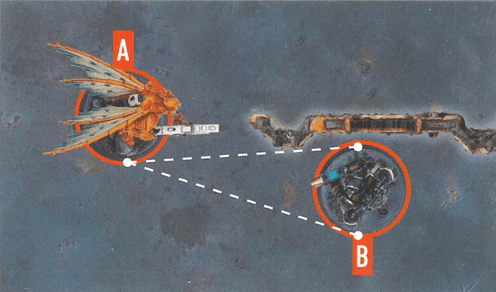
Rules such as cover and obscured require you to determine if something is intervening, e.g., terrain. Most of the time this is easily determined – if it's between the operative and the intended target, it's intervening. Sometimes this will be unclear, so we use targeting lines.

Targeting Lines

To use targeting lines, the operative's player draws imaginary straight lines 1mm in diameter from any point of its base to every facing part of the intended target's base. Anything at least one of these lines cross is intervening. Anything all of these lines cross is wholly intervening.

Targeting Angles

The operative's player decides from which point of the base targeting lines are drawn from. This can allow the operative to get a more favourable targeting angle imagine the operative leaning right or left as appropriate.

Other Measurements

Intervening is usually determined from one operative to another, but some rare rules will require you to determine it from other things such as markers. In such instances, treat all parts of that thing as the 'base' when determining this.
Rule example
Targeting lines cross terrain, therefore it's intervening.
Rule example
Due to where operative A's player has decided to draw the targeting lines from, the terrain is not intervening.
Rule example
None of these targeting lines cross terrain feature A, therefore it's not intervening.
Note: Most commonly, targeting lines can be drawn in a two-dimensional (top down) manner for ease. However, if there's a difference in height between the operatives (e.g., one of them is on Vantage terrain), targeting lines should be drawn in a three-dimensional manner.

Keywords

Keywords are an identification method for certain rules. You will most commonly use keywords with operatives – some rules will only affect operatives with the relevant keywords.

Special Keywords

Some rare rules also have keywords, e. g. , SUPPORT or STRATEGIC GAMBIT. These keywords mean nothing on their own, but other rules interact with them.

Formatting

Keywords are shown in KEYWORD BOLD font. Those in orange with a skull symbol, e. g. , TEMPESTUS AQUILON, are faction keywords used to identify all operatives/rules from that kill team.

Markers

Markers are placed in precise locations (this must be a location in which they can be placed) and impact the game and operatives around them. They can be placed underneath operatives (temporarily remove operatives to do so), and operatives can be placed upon them.

Marker Sizes

Objective markers are 40mm in diameter. All other markers are 20mm in diameter. Some markers are known as mission markers. This means nothing on its own, but other rules interact with it.

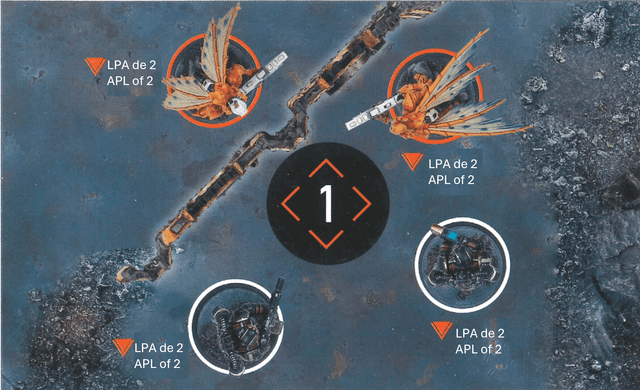
Contesting and Control

Operatives contest markers within their control range. Friendly operatives control a marker if the total APL of those contesting it is greater than that of enemy operatives, but control cannot change during an action. While an operative is carrying a marker, it contests and controls that marker, and is the only operative that can.

Objective Markers

Objective markers are the most common marker, representing vital locations in the killzone. Controlling them is often required to achieve victory.
Rule example
Only three operatives contest the objective marker, as it isn't within control range of the orange operative on the left (the terrain feature prevents it from being visible). The total APL of the orange operatives contesting the objective marker is 2. The total APL of the white operatives contesting it is 4, so they control it.
Notes
It's fine to use a miniature to represent a marker, but have a normal marker available if it creates rules issues (e.g., it's too big).

Obscured

Obscured is determined from one operative to another, usually when one of them is shooting. An operative is obscured if there's intervening Heavy terrain that's more than 1" from both operatives. However, it cannot be obscured by intervening Heavy terrain that's within 1" of either operative.

Shooting Effects

When an operative is shooting, if the target operative is obscured:
The attacker must discard one success of their choice instead of retaining itAll the attacker's critical successes are retained as normal successes and cannot be changed to critical successes (this takes precedence over all other rules)
Rule example
Operative B is visible to operative A through a window. However, there's intervening Heavy terrain more than 1" from both operatives, therefore operative B is obscured.
Rule example
There's intervening Heavy terrain, but it's within 1" of A, therefore operative B is not obscured.
Rule example
There's intervening Heavy terrain. Whilst parts of it are within 1" of the operatives, part of it isn't, therefore operative B is obscured.
Notes
Obscured is when an operative is a valid target, but intervening obstacles (usually terrain) make it a less efficient targetImagine the operative having to target the enemy through a ruin or distant window

Operatives

Operatives are the Citadel miniatures used in the game. Your operatives are friendly operatives, and your opponent's operatives are enemy operatives.

Orders

Engage

The operative can perform actions as normal and can counteract.

Conceal

The operative cannot perform Shoot and Charge actions, and it cannot counteract. However, it's not a valid target while it's in cover.
Restrictions:
Cannot perform Shoot actionsCannot perform Charge actionsCannot counteract

Ploys

Players can spend CP on ploys to gain rules bonuses at the opportune moment. Unless otherwise specified, all ploys cost 1CP.

Ploy Types

There are two types of ploys:
Every strategy ploy is a STRATEGIC GAMBIT (used in the Gambit step of the Strategy phase). Some apply rules that are resolved "immediately"; otherwise, they apply rules that last until the end of the turning point. Firefight ploys are used in the Firefight phase and apply rules as the ploy specifies.

Command Re-Roll

1CP: Use this firefight ploy after rolling your attack or defence dice. You can re-roll one of those dice.
All players have access to the Command Re-roll firefight ployOther than Command Re-roll, each player cannot use each ploy more than once per turning point

Precedence

Some rare rules will conflict with each other, so it must be established which takes precedence.

Priority Order

In order of priority, a rule takes precedence if:
It specifically says soThe online designer's commentary says soIt's not found in the core book (i. e. , other rules take precedence over core book rules)It says "cannot"The player with initiative decides

Roll-off

If a rule requires a roll-off, both players roll one D6 and whoever has the highest wins the roll-off. If there's a tie, roll-off again.

Tokens

Tokens are used to help you keep track of rules effects. They are often placed next to the relevant operative, but can be moved to make space for other operatives and markers as necessary. They are removed when the tracked rules effect ends.

Valid Target

Some rules require you to select a valid target for an operative. This is most common when an operative is shooting, but some rare rules require it too. If the intended target has an Engage order, it's a valid target if it's visible to the operative. If the intended target has a Conceal order, it's a valid target if it's visible to the operative and not in cover.
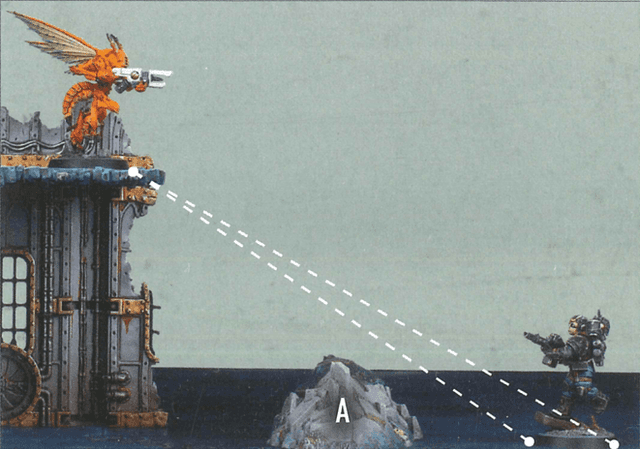
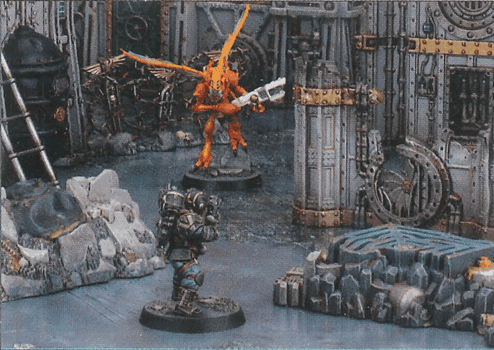
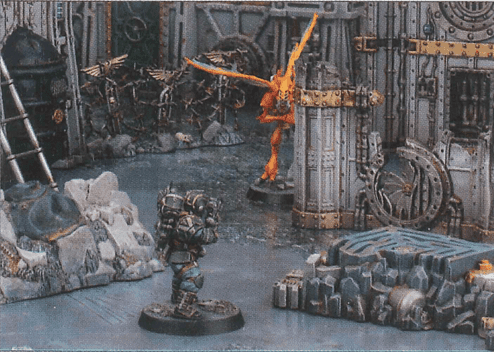
Visible

For something to be visible, the operative must be able to see it. To check visibility, look from behind the operative and determine if you can draw an unobstructed straight line 1mm in diameter from its head to any part of what it's trying to see. Ignore operatives' bases when determining this. An operative is always visible to itself.

Rule example
Full visibility example.
Rule example
Partial visibility example.
Notes
The enemy operative is visible in both images below, even when partially behind the nearby ruin

Killzone Floor

The killzone floor is the lowest level of the killzone (i.e., the game board). Anything that's on a marker that's on the killzone floor is also on the killzone floor.

Actions

Actions have effects and conditions. Conditions must be fulfilled for the operative to perform that action, whilst effects occur when an operative is performing that action, including any requirements when doing so.

Action Types

Universal Actions

The most common actions you will use and can be performed by all operatives unless specified otherwise.

Unique Actions

Rarer actions in your kill team's rules. Only specified operatives can perform them.

Mission Actions

Specific to the mission or killzone you are playing. If there are any, they will be in your mission pack, killzone rules or the equipment you've selected.

Free Actions

Can only be performed when another rule specifies, and the following rules apply: - The conditions of the action must be met. - It does not cost the operative any additional AP to perform the action. - The operative would still count as performing the action for all other rules purposes. - If an operative performs a free action outside of their activation, it does not prevent them from performing that action during their activation, or vice versa.
Universal Actions

Reposition

Reposition1APL
Cannot move within control range of an enemy operative, unless one or more other friendly operatives are already within control range of that enemy operative
Cannot finish the move within control range of that enemy operative
Cannot perform while within control range of an enemy operative
Cannot perform during the same activation as Fall Back or Charge

Dash

Dash1APL
Since operatives cannot perform the same action more than once in their activation, Dash actions are the way operatives can move a greater distance.
Cannot perform while within control range of an enemy operative
Cannot perform during the same activation as Charge

Fall Back

Fall Back2APL
If an operative is activated within the control range of an enemy operative, the Fall Back action is a way to withdraw
It costs 2AP, so most operatives will not be able to perform more actions in that activation
Cannot perform unless an enemy operative is within its control range
Cannot perform during the same activation as Reposition or Charge

Charge

Charge1APL
Charge actions allow operatives to effectively pin down enemies, but since they need to be in an engagement order to do so, they may become vulnerable to enemy shooting
Must finish the move within control range of an enemy operative
If it moves within control range of an enemy operative that no other friendly operatives are within control range of, it cannot leave that operative's control range
Cannot perform while it has a Conceal order
Cannot perform if already within control range of an enemy operative
Cannot perform during the same activation as Reposition, Dash or Fall Back

Pick Up Marker

Pick Up Marker1APL
If the Pick Up Marker action can be performed on a marker, it will be specified elsewhere, such as in your mission pack
Cannot perform while within control range of an enemy operative
Cannot perform while already carrying a marker

Place Marker

Place Marker1APL
If an operative carrying a marker is incapacitated, it must perform this action before being removed from the killzone, but does so for 0AP
This takes precedence over all rules that prevent it from doing so
Cannot perform during the same activation as Pick Up Marker (unless incapacitated)

Shoot

Shoot1APL
To no one's surprise, Kill Team can be a very lethal game, so if you frequently lose operatives to enemy shooting, consider playing more defensively, placing your operatives in cover and using a Conceal order
Cannot perform while it has a Conceal order
Cannot perform while within control range of an enemy operative

Fight

Fight1APL
Unlike shooting, combat is a brutal back-and-forth. Be careful when choosing whom you fight, as they will fight back
Cannot perform unless an enemy operative is within its control range

Counteract

Counteract0APL
Counteracting is optional, so you can choose not to
In either case, activation alternates back to your opponent afterwards
Counteracting isn't an activation, it's instead of activating. This difference is important; for instance, it means action restrictions won't apply
Each operative can only counteract once per turning point
Cannot move more than 2" while counteracting (this is not a change to its Move stat, and takes precedence over all other rules)

Movement Rules

Operatives cannot move through terrain — they must move around, climb over or drop/jump off it.

Climbing

An operative must be within 1" horizontally and 3" vertically of terrain that's visible to them to climb it. Each climb is treated as a minimum of 2" vertically.
A 1" distance is treated as 2"

Dropping

Operatives drop down when they move off terrain or after they've jumped. Ignore 2" of vertical distance that they drop during each action.
A vertical drop of 2" or less is ignored. If they drop multiple times during an action, only 2" total is ignored, not 2" from each drop.

Jumping

Operatives can jump from terrain when they move off it. You can move them up to 4" horizontally from the edge when they jump, done like any other move except in one straight-line increment. The operative must then drop or climb from there.
When jumping to a terrain feature, you can ignore its height difference of 1" or less, including its rampart (if any). However, when jumping from a terrain feature, if it has a rampart, you must climb it first.
The operative moves up 4" until it's above the highest point it must climb over. It moves across 2" until its base is fully past the rampart, then drops down for 0" (as the drop is less than 2").
Remember that increments are rounded up, so if the operative moves 3. 5", this is treated as 4"

Terrain Types

A terrain feature is composed of different parts, each of which is a type of terrain. One part can be more than one type.

Larger terrain is . It can obscure operatives.

Rule example
It's good to have a mixture of Light and Heavy terrain in your killzone, as some other rules interact with each type differently.

Light

Smaller terrain is Light. It doesn't have any additional rules, but other rules interact with it differently (e. g. , Vantage terrain here).

Rule example
Light terrain examples

Blocking

Blocking terrain is usually attributed to gaps between or underneath a terrain feature. Visibility cannot be drawn through such gaps, and for the purposes of cover and obscured, the gaps are intervening like the terrain around it.

Technically, Blocking terrain isn't actually physical terrain, but rather the gaps operatives shouldn't be able to see through. Blocking terrain is rare, but it exists for the necessary instances.

Rule example
The gap under this pipe is blocking terrain
Rule example
The door's viewpoint or the broken vent is blocking terrain

Vantage

Vantage terrain is the upper levels of the killzone—areas operatives can be placed upon above the game board. If terrain is not Vantage terrain, then operatives can move over it, but they cannot finish a move or be set up on it. Vantage terrain is also Light terrain.

Firstly, whenever an operative on Vantage terrain is shooting an operative that has an Engage order, its ranged weapon has the 1 weapon rule if the target operative is at least 2" lower than it, or 2 if the target operative is at least 4" lower than it.

Secondly, whenever you are selecting a valid target for an operative on Vantage terrain, operatives at least 2" lower than that operative with a Conceal order cannot use Light terrain for cover.

Thirdly, for the purposes of obscured, ignore terrain connected to Vantage terrain the active operative or the intended target is on.

Rule example
As Vantage terrain is also Light, an operative on Vantage terrain will often be in cover from operatives lower than them — imagine them crouching down to gain a cover save or avoid being a valid target.
An operative on Vantage terrain can target an operative with a Conceal order that's 2" lower than them and only in cover from Light terrain.
If an operative is obstructed from moving across Vantage terrain by enemy operatives or other terrain features, it can move around these obstructions (without dropping off) so long as part of its base is always on the Vantage terrain.

Accessible

Operatives can move through Accessible terrain (this takes precedence over Bases, and Terrain and Movement), but it counts as an additional 1" to do so. Only the centre of an operative's base needs to move through Accessible terrain, so base sizes are irrelevant.

Rule example
The door is accessible terrain

Insignificant

Insignificant terrain is usually very small. For the purposes of climbing and dropping, ignore it.

Rule example
Small piles of rubble are insignificant terrain. An operative can move over and across Insignificant terrain without going up and down.

Exposed

Exposed terrain is usually very small, or terrain with large gaps that operatives shouldn't be able to take cover behind.

It's particularly important to identify Insignificant and Exposed terrain before the battle, to prevent misunderstandings later on.

Rule example
This ladder and these hanging chains are exposed terrain

Wall

Special terrain type with specific rules for movement and visibility

Operatives cannot move over or through Wall terrain (this takes precedence over all other rules).
Visibility cannot be determined over or through Wall terrain.
Distances cannot be measured over or through Wall terrain; they must be measured around it using the shortest possible route.
For the purposes of cover and obscured, only the corners and ends of Wall terrain can intervene, unless the active operative has passed it.

Barred

Visibility cannot be drawn through this terrain unless the operative or what they're trying to see is horizontally within 1" of it.

Unbroken windows are Barred terrain

Killzone: Gallowdark

Killzone: Gallowdark uses a 606mm x 703mm game board with a 6x7 grid system for setting up. It has 4x short walls with hatchway and pillars and 2x each other terrain feature specified on page 109. It also has 8x left and 8x right pillars, and 30x pillar caps to complete terrain configuration. Note that some mission maps use less than this.

Components
4x short walls with hatchway and pillars
2x each other terrain feature
8x left and 8x right pillars
30x pillar caps
Terrain Features

Gallowdark Wall

A Gallowdark wall terrain feature is and Wall terrain. Some walls include a hatchway.
Operatives cannot move over or through Wall terrain (this takes precedence over all other rules)Visibility cannot be determined over or through Wall terrainDistances cannot be measured over or through Wall terrain; they must be measured around it using the shortest possible routeFor the purposes of cover and obscured, only the corners and ends of Wall terrain can intervene, unless the active operative has passed it
Operative A would usually be within 3" of operative B, but as distances cannot be measured over or through Wall terrain, it must be measured around the Gallowdark wall. This would make operative A more than 3" from operative B.
Operative B is not in cover as a corner or end of the wall is not intervening. Note that minor parts of the wall that protrude do not make a corner or end alone; it must be the main structure of the wall that turns a corner or ends.
A corner of the wall is intervening, therefore operative B is in cover.
Operative A has passed the corner of the wall, therefore it's not intervening and operative B is not in cover. Note that if operative A was wholly on the left side of the dotted black line, the wall would be intervening and operative B would be in cover.
An end of the wall is intervening, therefore operative B is in cover.
As the hatchway is open, an end of the wall is intervening. It's more than 1" from both operatives, therefore operative B is obscured.

Hatchway

A hatchway has two statuses: closed and open. It has two parts an access point and a hatch and their terrain types depend upon the hatchway's status. Operatives can perform the Operate Hatch mission action to change its status.
Hatchways begin the battle closedAs an open hatchway's access point is Exposed terrain, the walls either side of it must be used for cover and obscuring instead of the access pointIf operatives would prevent the hatch from fully opening or closing, temporarily remove them from the killzone, open or close the hatch, then return the operatives as close as possible to their original locationIf an operative is within an enemy operative's control range before a hatch is opened, it must be returned there
Special Rules

Condensed Environment

Special rules for weapons in confined spacesWeapons with Blast, Torrent and/or x" Devastating also have Lethal 5+

On Guard

Interrupt enemy actions with Fight or ShootOnce during each enemy operative's activation, after that enemy operative performs an action, you can interrupt that activationSelect one friendly operative on guard to perform the Fight or Shoot action for freeCan perform the Shoot action while within control range of an enemy operative (point-blank shot):- Target the enemy operative within your operative's control range- Worsen the Hit stat of your operative's weapons by 1- Until the end of the interrupted enemy operative's activation, your operative cannot retaliateDetermine the target as normal for these actions (don't have to target the operative you interrupted)

Killzone: Bheta-Decima

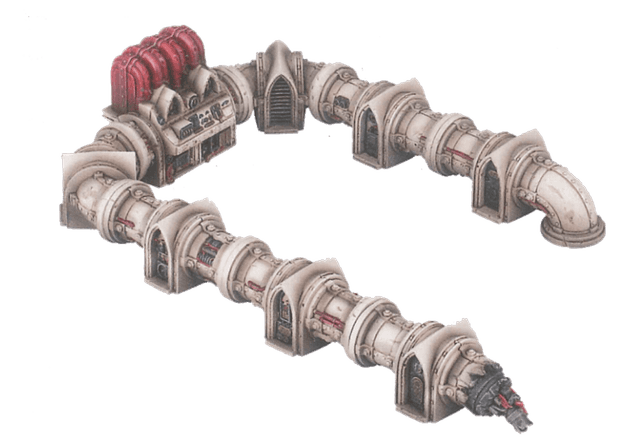
Killzone: Bheta-Decima has 2x short gantries, 4x medium gantries, 2x long gantries and 1x thermometric condenser.
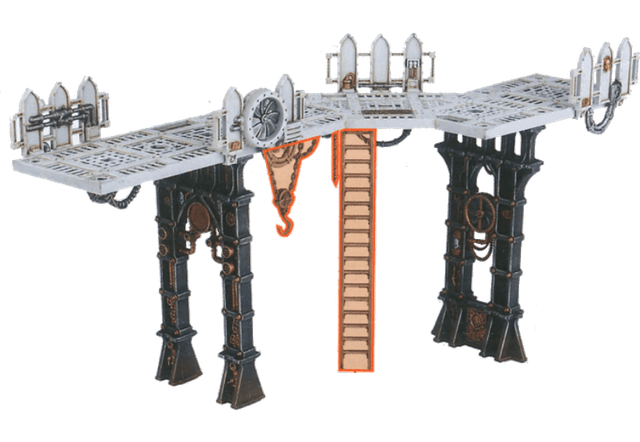
Components
2x short gantries
4x medium gantries
2x long gantries
1x thermometric condenser
Terrain Features

Gantry

Gantry terrain features come in three sizes: long, medium, and short.
When gantries are connected (i. e. , their gantry floors are touching each other), they are treated as the same terrainA gantry's footprint includes the gantry itself, plus the area underneath it
Connected gantries are treated as the same terrain
The footprint of a gantry includes the area underneath it

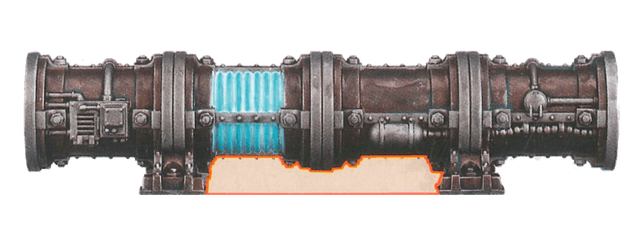
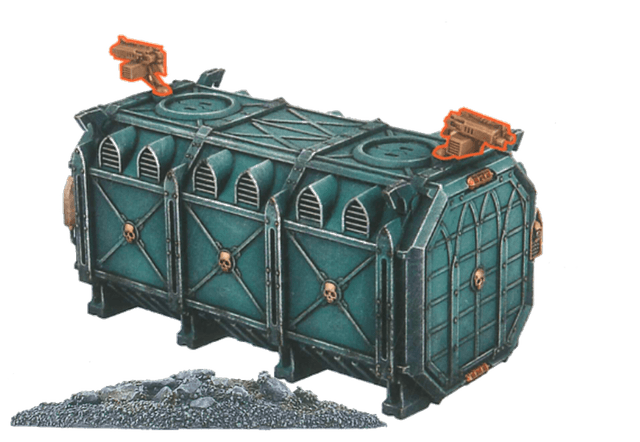
Thermometric Condenser

The inner-ledge height difference is ignored
Special Rules

Equipment

Equipment placement rulesEquipment can be set up on Vantage terrain (this takes precedence over setting it up on the killzone floor)

Killzone: Volkus

Killzone: Volkus has 2x strongholds, 2x large ruins, 2x small ruins, 2x heavy rubble, and 3x light rubble.
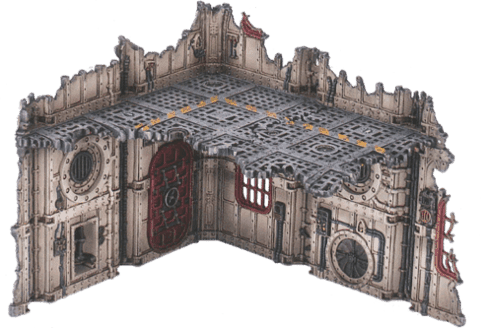
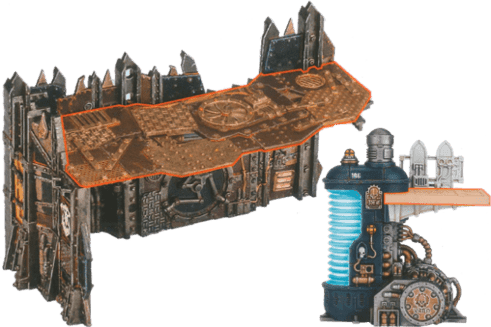
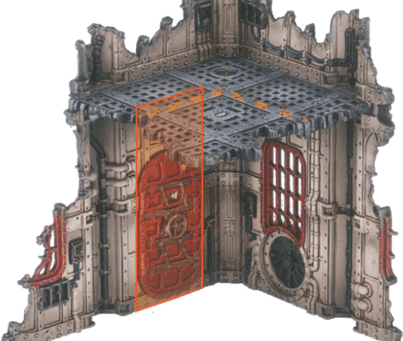
Components
2x strongholds
2x large ruins
2x small ruins
2x heavy rubble
3x light rubble
Terrain Features

Stronghold

A multi-level fortified structure with various defensive features.
For the purposes of control range, ignore the door and parts of this terrain feature less than 2" high when determining visibility
Parts A-D of a stronghold terrain feature
Example of control range visibility through doors and low walls

Large Ruin

A partially destroyed building with multiple levels.
Parts A-E of a large ruin terrain feature

Small Ruin

A smaller destroyed structure.
Example of a small ruin terrain feature

Heavy Rubble

Dense debris and ruins.
Example of rubble terrain

Light Rubble

Scattered debris and ruins.
Example of light rubble terrain
Special Rules

Condensed Stronghold

Special weapon rules inside strongholdsWeapons with Blast, Torrent and/or x" Devastating gain Lethal 5+ against targets wholly within stronghold on killzone floor

Garrisoned Stronghold

Special fighting rules for stronghold defendersWhen an operative wholly within a stronghold terrain feature is retaliating against an operative that isn't, the defender resolves first (this takes precedence over the normal fight resolution order)

Weapon Rules

Weapon rules apply whenever a friendly operative uses a weapon that has them. Weapons gain no benefit from having the same weapon rule more than once, unless the weapon rule has an x, in which case select which x to use. If a friendly operative is using a weapon that has multiple weapon rules that would take effect at the same time, you can choose the order they take effect.

Accurate X

You can retain up to x attack dice as normal successes without rolling them. If a weapon has more than one instance of Accurate x, you can treat it as one instance of Accurate 2 instead.

Balanced

You can re-roll one of your attack dice.

Blast X

The target you select is the primary target. After shooting the primary target, shoot with this weapon against each secondary target in an order of your choice (roll each sequence separately). Secondary targets are other operatives visible to and within x of the primary target. Secondary targets are in cover and obscured if the primary target was.

Brutal

Your opponent can only block with critical successes.

Lethal X+

Your successes equal to or greater than x are critical successes.

Ceaseless

You can re-roll any of your attack dice results of one result (e.g., results of 2).

Devastating X

Each retained critical success immediately inflicts x damage on the operative this weapon is being used against. If the rule starts with a distance (e.g., 1" Devastating x), inflict x damage on that operative and each other operative visible to and within that distance of it.

Heavy

An operative cannot use this weapon in an activation in which it moved, and it cannot move in an activation in which it used this weapon. If the rule is Heavy (x only), where x is a move action, only that move is allowed. This weapon rule has no effect on preventing the Guard action.

Hot

After an operative uses this weapon, roll one D6. If the result is less than the weapon's Hit stat, inflict damage on that operative equal to the result multiplied by two. If it's used multiple times in one action (e.g., Blast), still only roll one D6.

Limited X

After an operative uses this weapon a number of times in the battle equal to x, they no longer have it. If it's used multiple times in one action (e.g., Blast), treat this as one use.

Piercing X

The defender collects x less defence dice. If the rule is Piercing Crits x, this only comes into effect if you retain any critical successes.

Punishing

If you retain any critical successes, you can retain one of your fails as a normal success instead of discarding it.

Range X

Only operatives within x of the active operative can be valid targets.

Relentless

You can re-roll any of your attack dice.

Rending

If you retain any critical successes, you can retain one of your normal successes as a critical success instead.

Saturate

The defender cannot retain cover saves.

Seek

When selecting a valid target, operatives cannot use terrain for cover. If the rule is Seek Light, operatives cannot use Light terrain for cover. Whilst this can allow such operatives to be targeted (assuming they're visible), it doesn't remove their cover save (if any).

Severe

If you don't retain any critical successes, you can change one of your normal successes to a critical success. Any rules that take effect as a result of retaining a critical success still do.

Shock

The first time you strike with a critical success in each sequence, also discard one of your opponent's unresolved normal successes (or a critical success if there are none).

Silent

An operative can perform the Shoot action with this weapon while it has a Conceal order.

Stun

If you retain any critical successes, subtract 1 from the APL stat of the operative this weapon is being used against until the end of its next activation.

Torrent X

Select a valid target as normal as the primary target, then select any number of other valid targets within x of the first valid target as secondary targets. Shoot with this weapon against all of them in an order of your choice (roll each sequence separately).